
Main Courses
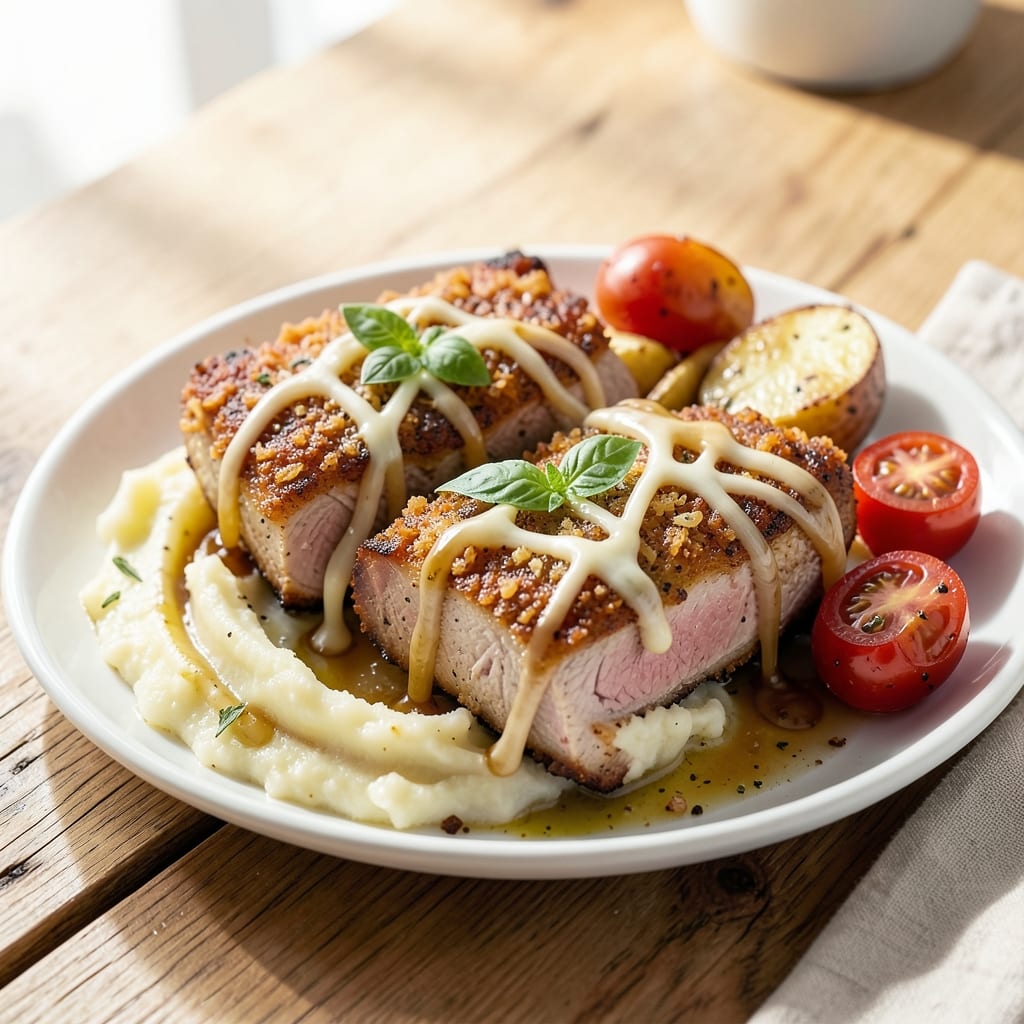
Baked parmesan crusted pork chops deliver that perfect balance of crispy, golden crust and impossibly tender meat—something I've perfected after years of working with pork at The Smoky Pig. 🔥 The secret lies in the breading technique: a mix of panko, parmesan, and herbs that creates a shield for even cooking while locking in juices. This recipe transforms simple pork chops into a restaurant-worthy main course that's foolproof for weeknight dinners.
What sets this method apart is the baking approach—high heat for a crispy exterior without drying out the centers. I've tested countless variations, and this combination of panko and parmesan creates the ideal texture: shatteringly crisp on the outside while maintaining that melt-in-your-mouth tenderness inside. The key is patting the chops dry before breading, which ensures the crust adheres perfectly and browns beautifully.
By the time these come out of the oven, you'll have pork chops with a golden, parmesan-encrusted crust that shatters at every bite, revealing juicy pink centers. The aroma alone will have everyone gathering at the table, and the flavor—savory, herby, and rich—makes these worth the effort. This is the kind of dish that elevates a simple weeknight meal into something special without requiring advanced techniques.
The best part? These pair perfectly with roasted vegetables, mashed potatoes, or a fresh salad to round out the meal. Let's get started on creating your perfect batch of parmesan-crusted pork chops.
Ingredients for baked parmesan crusted pork chops
Golden crust meets juicy perfection—these ingredients create restaurant-quality pork chops at home.
| Ingredient | Amount | Notes |
|---|---|---|
| Bone-In Pork Chops 🥩 | 4 pieces | 1-inch thick, center-cut preferred |
| Extra-Virgin Olive Oil 🫒 | 2 tbsp | For greasing baking dish |
| Panko Breadcrumbs 🍞 | 1 cup | Light and crispy texture |
| Parmesan Cheese 🧀 | ½ cup | Freshly grated, fine texture |
| Dried Italian Seasoning 🌿 | 1 tbsp | Or 1 tsp each dried oregano, basil, thyme |
| Garlic Powder 🧄 | 1 tsp | Freshly ground preferred |
| Diamond Crystal Kosher Salt 🧂 | 1 tsp | For seasoning and crust |
| Ground Black Pepper 🌶️ | ½ tsp | Freshly cracked for best flavor |
| Unsalted Butter 🧈 | 2 tbsp | Melted for basting |
| Fresh Lemon Juice 🍋 | 1 tbsp | Brightens the crust |
| Heavy Cream 🥛 | ¼ cup | For basting during baking |
The pork chops are the star, so center-cut, 1-inch thick pieces are non-negotiable—they hold up best to the high-heat baking. I always grab mine from Whole Foods or my butcher's counter, where they're trimmed perfectly. Look for chops with good marbling—those little white streaks of fat ensure juicy results. If you can't find bone-in, bone-less works too, but the bone helps keep them moist during baking. Pat them very dry with paper towels before breading, or the crust won't stick worth a damn.
No panko? Crushed cornflakes or seasoned breadcrumbs work in a pinch, but panko's light texture is key for that shatteringly crisp crust. Freshly grated Parmesan makes all the difference—pre-grated has anti-caking agents that ruin the texture. For the Italian seasoning, I use Badia brand from the bulk section, but any quality blend works. The butter and cream might sound indulgent, but they're what turn good pork chops into showstopping ones—basting with melted butter and cream keeps everything impossibly tender while building that golden crust.
Prep ahead: Mix the breading dry ingredients in a shallow dish—Parmesan, panko, seasonings, salt, and pepper—so it's ready when you are. The chops keep 2 days in the fridge, but bread them just before baking for maximum crispiness. Leftovers? These reheat beautifully—200°F oven for 10 minutes with a splash of water in the pan to keep them moist. Store in an airtight container with parchment between layers to prevent sticking.
Why You'll Love This Recipe
- No-Fuss Crust: I swear by this method—just brush, coat, bake. No deep-frying, no flipping a pan every two minutes. The panko and parmesan stick like glue, and the bone-in chops stay juicy while the crust gets golden. (Yes, even if I’m distracted by the kids.)
- Cheesy Crisp Magic: That first bite—crunchy, salty, herby crust giving way to tender pork? It’s like someone sprinkled happiness on a plate. The Italian seasoning adds this bright, sun-dried tomato vibe that makes it taste like a vacation dish, not just weeknight dinner.
- Leftovers That Don’t Suck: Honestly, I make these on Sundays because the leftovers reheat like a dream. Toss them in a sandwich the next day, or slice them cold for a charcuterie board. The crust stays crispy, the pork stays juicy, and no one complains when I pack it for lunch.
- Budget-Friendly Protein: Bone-in pork chops are cheaper than their boneless cousins, and this recipe stretches them further. A single pan, minimal ingredients, and zero waste—just the bones left for stock (if I remember). It’s the kind of meal that makes grocery night less stressful.
Step-by-step instructions for crispy Parmesan pork chops
Here's how to achieve that perfect golden crust while keeping the meat impossibly tender.
👨🍳 Step 1: Prep the Pork Chops for Maximum Crisp
Pat the 4 pieces bone-in pork chops completely dry with paper towels—this is non-negotiable for crispy crust. I like to press firmly on each side to remove all moisture. The drier the surface, the better the breading will adhere and crisp. Place them on a clean plate and let them sit at room temperature for 15-20 minutes while you prep the rest.
While waiting, preheat your oven to 425°F for maximum browning power. This high heat is what creates that perfect golden crust while keeping the inside juicy. I always use a wire rack on a baking sheet—it allows air to circulate underneath, preventing soggy bottoms and ensuring even browning on all sides.
👨🍳 Step 2: Create the Crispy Breading Mixture
In a shallow bowl, combine the 1 cup panko breadcrumbs, 0.5 cup freshly grated Parmesan cheese, 1 tablespoon dried Italian seasoning, 1 teaspoon garlic powder, 1 teaspoon Diamond Crystal kosher salt, and 0.5 teaspoon ground black pepper. Mix thoroughly with your hands until every crumb is evenly coated—this ensures maximum flavor in every bite.
I always use freshly grated Parmesan because pre-shredded cheese contains anti-caking agents that prevent proper melting and browning. The panko should look like it's coated in fine cheese dust rather than having large Parmesan chunks. This mixture is what creates that irresistible crunch we're after.
🍳 Step 3: Bread and Sear the Pork Chops
Working with one chop at a time, dip each piece into the 2 tablespoons extra-virgin olive oil (just enough to lightly coat), then press firmly into the breadcrumb mixture, covering all sides completely. The oil helps the breading stick and creates that initial sear. Place the breaded chops on the prepared wire rack, leaving 1 inch between each piece for proper air circulation.
Transfer the rack to the preheated oven and bake for 15 minutes. Here's the thing—don't peek! Every time you open the oven, you lose heat and steam, which can make the crust soggy. You'll know they're ready when the edges are deep golden brown and the crust is crispy enough that it holds its shape when you lift it.
🔥 Step 4: Baste for Extra Juiciness
Remove the chops from the oven and transfer them to a clean plate. In a small bowl, whisk together the 2 tablespoons melted unsalted butter and 1 tablespoon fresh lemon juice. This basting mixture is what takes these chops from good to restaurant-quality. Return the chops to the oven and pour the butter mixture evenly over the tops.
Bake for another 5-7 minutes until the butter bubbles and the crust becomes even more golden. The lemon juice brightens the Parmesan flavor while keeping the crust crisp. Watch closely during this time—the butter can burn quickly if left unattended. You want it bubbly but not browned.
⏰ Step 5: Rest and Serve with Perfect Texture
Transfer the chops to a cutting board and let them rest for 5 minutes before serving. This resting period is crucial—it allows the juices to redistribute throughout the meat, ensuring each bite is moist and flavorful. If you skip this step, you'll end up with dry pork chops that lose all their juices onto the plate.
Slice each chop diagonally through the bone for easy serving. The crust should be crispy and golden, the cheese should be melted but not greasy, and the meat should be tender enough to pull apart with a fork. Serve immediately with your favorite sides—roasted vegetables or a fresh salad work beautifully to cut through the richness.
Pro Tips For Making Baked Parmesan Crusted Pork Chops
- CRUST IT TWICE: I learned this the hard way—one thin layer of panko and Parmesan won’t stick worth a damn. After pressing the first coat into the pork chops, flip them over and do it again. The extra effort guarantees that crispy, golden crust you’re actually craving.
- SALT THE PORK LIKE IT’S YOUR JOB: Bone-in pork chops need salt to break down fibers and stay juicy, but most people underdo it. Season both sides generously with salt at least 30 minutes before baking—yes, even if the recipe doesn’t say to. Trust me, the crust will cling better, and the meat won’t dry out mid-cook.
- DON’T SKIP THE OIL SPRAY: That extra-virgin olive oil in the recipe isn’t just for flavor—it’s the glue. Lightly spray the baking sheet before adding the pork chops (about 2 tablespoons total), and give the chops a quick spray on the crust side right before baking. This prevents the Parmesan from sticking to the pan like glue and ensures even browning.
- BROWN FIRST, BAKE SECOND: Start the chops in a screaming-hot oven (450°F) for the first 5 minutes, uncovered. This sears the crust into place before it softens. After that, cover with foil and finish baking—this two-step method locks in moisture while keeping the crust crisp. (I know, I know, but trust the process.)
Storing and reheating this recipe
Refrigerator Storage
Store your baked parmesan crusted pork chops in an airtight container with parchment paper between layers to prevent sticking. These chops stay fresh for up to 3 days in the refrigerator at 40°F or below. I always let them cool completely before storing—hot food raises the internal temperature and can cause condensation, making the crust soggy. When reheating, I add a splash of water to the pan to keep the crust crispy. 🥩
Freezer Prep Tips
For longer storage, freeze the chops before baking. Place them on a baking sheet, freeze solid for 1 hour, then transfer to a freezer bag with parchment between layers. They'll keep for up to 3 months this way. When ready to bake, thaw in the fridge overnight—never microwave thaw as it can make the crust uneven and soggy. 🧊
Oven Reheating
My preferred method is reheating at 375°F for 10-12 minutes on a wire rack. This maintains that perfect crispy crust while warming through. Place a small metal bowl of water on the rack below to add moisture to the air—this helps prevent the crust from drying out. I cover the chops loosely with foil for the first 5 minutes, then remove it to crisp up again. 🔥
Air Fryer Option
For a quicker reheat, use your air fryer at 350°F for 4-5 minutes. This method works best if you've stored the chops with the crust intact. Spray lightly with olive oil before air frying to help restore crispiness. I find this works best for single servings rather than reheating the whole batch. ✨
Serving Leftovers
These chops reheat beautifully and make great sandwiches the next day. Toast a brioche bun, layer with reheated pork, and add a smear of garlic aioli or sweet onion jam. The crispy crust holds up perfectly in sandwiches, making it a fantastic lunch option. I also like to serve them cold in salads for a protein boost. 🥪
Crust Preservation
To keep the crust crispy when storing, I recommend reheating just before serving. If you must store reheated chops, place them in a 200°F oven for 2-3 minutes with a damp paper towel over them. This reactivates the moisture without steaming the crust. The key is always to reheat quickly at high heat to maintain texture. 💡
Nutrition facts
Frequently asked questions
Can I use bone-in or boneless pork chops for this recipe?
Bone-in pork chops are ideal because the bone helps retain moisture during baking. However, boneless chops work too—just select 1-inch thick pieces for even cooking. I recommend center-cut chops in either case, as they're less likely to dry out.
Why does my crust keep coming out soggy instead of crispy?
Soggy crusts usually happen from moisture—either in the chops or from opening the oven too early. Always pat the chops completely dry before breading, and don't peek during the 15-minute bake. The high heat at 425°F needs time to work its magic without interruption. For extra crispiness, try baking on a wire rack instead of a sheet pan.
How do I make this recipe ahead of time?
Prep the chops up to 2 days ahead—bread them and store in the fridge, but don't bake yet. When ready, bake straight from the fridge (add 5 minutes to cooking time) or thaw in the sink for 10 minutes before baking. For freezing, bread the chops, wrap individually in foil, and freeze for up to 3 months. Thaw overnight in the fridge before baking.
What's the best way to reheat leftovers without drying them out?
Reheat at 375°F for 10-12 minutes on a wire rack with a metal bowl of water below to add moisture. Cover loosely with foil for the first 5 minutes, then uncover to crisp the crust again. For single servings, an air fryer at 350°F for 4-5 minutes works wonders—just spray lightly with olive oil first.
Can I substitute panko with regular breadcrumbs?
Regular breadcrumbs will work, but they won't be as crispy. For best results, use panko or crush cornflakes lightly for a lighter texture. If using regular breadcrumbs, toast them in a dry pan for 2-3 minutes before mixing with Parmesan to improve crispiness. The key is getting that shatteringly crisp exterior!